The following information and images were obtained from here and roughly translated by me for convenience.
■Kagurazaka Zhu Que Cavern (Gold) Amaterasu♀ route strategy notes
This is not a complete guide. Please refer to it carefully.
This is a rough explanation for people who are unfamiliar with the route.
If you want more detailed information, please refer to the wiki or a strategy blog.
▼Requirements
・Scarlet equipment (Scarlet Fan Spear/Scarlet Flash Thunder Gun)
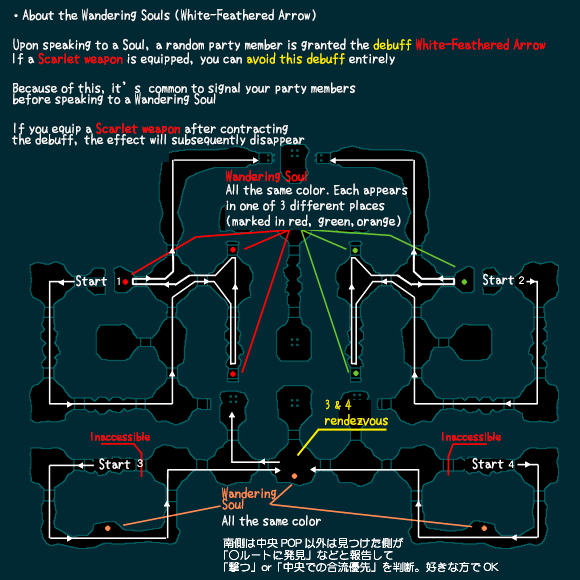
They are used to cancel the debuff (White-Feathered Arrow)
You can equip just before you receive the debuff
You will be able to obtain 1 Piece of Heaven and Earth twice from the yellow plasma
・Requires 3 demons (Ame-no-Uzume, Omoikane, Tajikarao)
to activate the Amaterasu♀ flag.
They are not sacrifices, and will not disappear.
Variants are also fine (or at least should be).
You can rebirth them to Lv1 to keep MAG summon costs low.
▼Miscellaneous information
・With a party of 3 people, split into routes 1, 2, 3. The third person checks the 4th route via the Rock Door MAP.
・If someone does not have a Scarlet weapon and is going to receive the White-Feathered Arrow debuff, they should summon Omoikane.
(Omoikane's debuff prevents demons from being summoned)
A party member without the weapon should also clear out enemies in the the Rock Door MAP before they receive the debuff.
Rather, they should do so because the other debuffs are troublesome. Party members may wait while one person clears, to make things smoother.
・Failing to trigger Amaterasu♀'s flag will change the run to Amaterasu♂ (such as touching a plasma with the wrong demon summoned)
▼Floors outline
1st floor → 2nd floor (4 different routes) → 3rd floor (activate plasma) → 4th floor → 5th floor → 6th floor → BOSS
▼About the route
Because the 2nd floor branches into 4 different routes, you'll need enough firepower to clear enemies by yourself.
With 5 people together you can split into pairs, which should also be good enough
It shouldn't be a problem if the party regroups after the 2nd floor.
・1 → 2A → 3 → 4 → 5 → 6 →BOSS
・1 → 2B → 3 → 4 → 5 → 6 →BOSS
・1 → 2C → 3 → 4 → 5 → 6 →BOSS
・1 → 2D → 3 → 4 → 5 → 6 →BOSS
I think it's best to pick which person takes what route once the party is formed
Something like "Person A takes 1" "Person B takes 2" etc.
▼Difficulty
You'll need the necessary firepower to be able to clear the 2nd floor by yourself
For those who are unsure, try to see if you can reach and clear the Susano-o boss fight once by yourself
If you can do that without any problems, it should be fine
▼MAP explanation
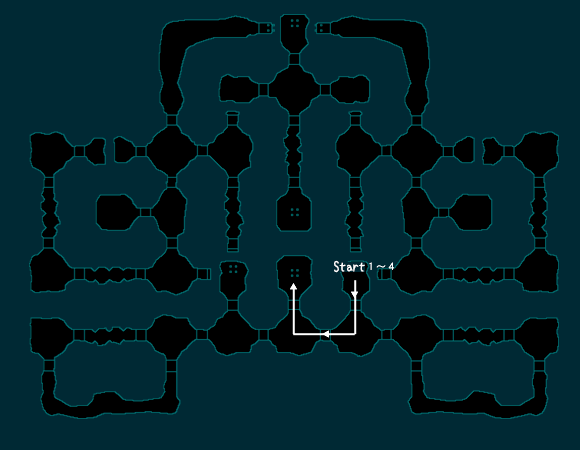
・Floor 1
・Floor 2
・Floor 3
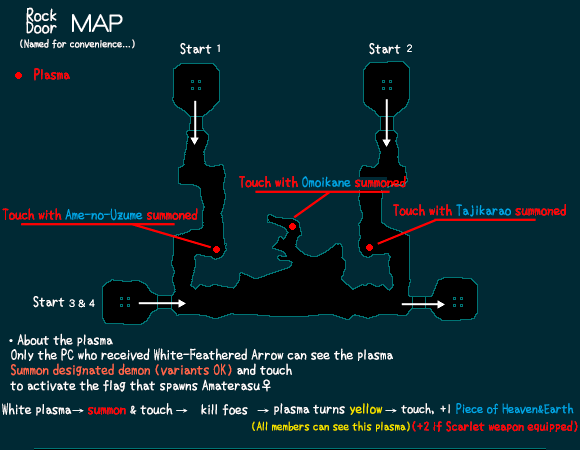
Be careful not to make a mistake when summoning the demons
Before touching the yellow plasma, don't forget to equip a Scarlet weapon
・Floor 4
Just passing through, nothing particular about this floor
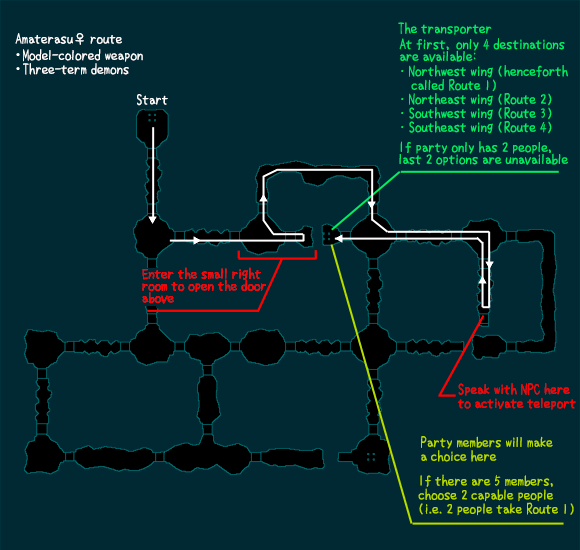
・Floor 5
Be sure to choose the correct floor at the transporter
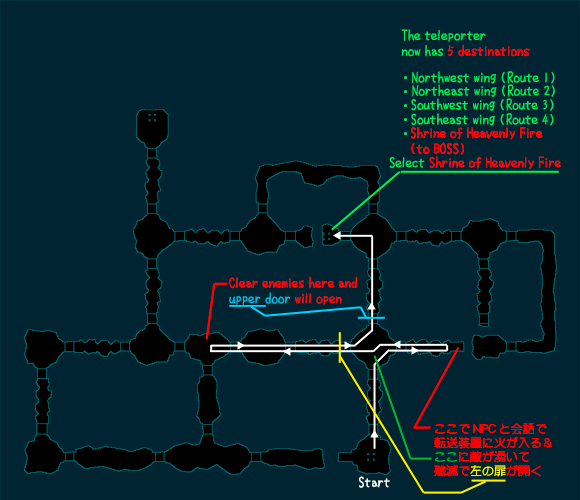
・Floor 6
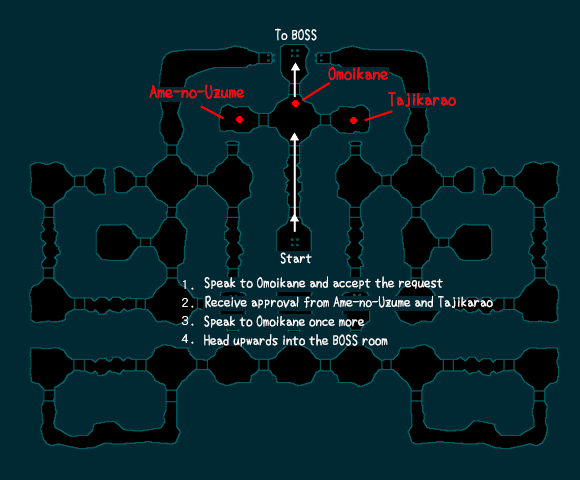
Omoikane's room has a lot of aggressive enemies, so you should clear it before speaking to him
After receiving the approval of Ame-no-Uzume and Tajikarao, don't forget to speak with Omoikane again
・Floor 7
BOSS room